Saturday, April 19, 2008

Pink and Zebra Cake:

Shadow Word generated at Pimp-My-Profile.com


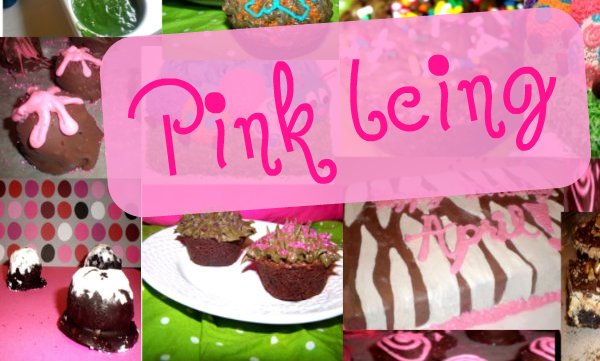
I made this cake for my friends birthday. My friend declared that she wanted a chocolate cake, however since I'm not a big fan of plain chocolate cake, i decided to mix it up a little. I followed a recipe that called for chocolate cupcakes, with a cheesecake center. instead of the cheesecake in the cupcakes, i made a layer of cheesecake in the middle of my cake by pouring some of the batter in it, then putting on the cheesecake layer, then pouring the rest of the batter on top. I was a little scared at how this recipe would turn out, however, it turned out pretty good. I also made some red velvet cake balls to go along with the cake since she was having some people over, and i didn't know how many the cake would feed. Turns out it was more than enough, and the zebra was a big hit! O yeah, I didn't use any fondant on my cake, i have yet to experiment with that. I iced it with regular old bags, but i still think it looked pretty good, and definitely tasted Amazing!


Friday, April 18, 2008

Cookie Dough + Brownies=YUM!

Cookie Dough Brownies!!

Brownies:

1 package fudge brownie mix
1/2 cup water
1/2 cup vegetable oil
1 egg

1/2 cup semisweet chocolate chips


Filling:

1/2 cup butter, softened
1/2 cup brown sugar, firmly packed
1/2 cup granulated sugar
2 tablespoons milk
1 teaspoon vanilla extract
1 cup all-purpose flour
I Also added:
1 teaspoon butter flavoring
1 cup oatmeal


Glaze:

1 cup semisweet chocolate chips
1-2 tablespoons butter or oil (its easier to spread thinner glaze, but estimate to see how thick/thin you want it.)
3/4 cup chopped nuts


Heat oven to 350 degrees F. Grease bottom only of a 13 x 9-inch pan. In large bowl, combine brownie mix, water, oil and eggs. Beat 50 strokes by hand. Stir in 1/2 cup chocolate chips. Spread in greased pan. Bake for 30 to 35 minutes. Do not overbake. Cool completely.

Filling: In large bowl, beat 1/2 cup butter, brown sugar and granulated sugar until light and fluffy. Add milk and vanilla extract; blend well. Add flour; mix well. Spread over cool brownies.

Glaze: In small microwave-safe bowl, melt chocolate chips and butter or oil on MEDIUM for 1 to 2 minutes or until chocolate is melted. Stir until smooth. Carefully spoon glaze over filling; spread to cover. Sprinkle with nuts, pressing down slightly. Cut into bars. Store in
refrigerator.


Yummm!!!!

Original recipe courtesy of: aaa-recipes.com

Tuesday, April 15, 2008

Heavenly Cookies and Cream Cake

Cake Balls..

..Or No Cake Balls??, That is the question!


If heaven was a cake, it would taste like this one. This cake turned out absolutely AMAZING! I recommend it to any chocolate, or Oreo lover for that matter. I couldn't decide if i liked it better with cake balls on top or not through, so the choice is yours! Anyways, this cake has a rich, moist chocolate cake base, and in the middle is a cookies and cream-cream cheese layer, not to mention it's covered with chocolate cream cheese icing, the perfect combination of all the best flavors!

Heres what i did:


INGREDIENTS

For the cake:

  • 1 cup hot coffee
  • 1 cup unsweetened cocoa powder
  • 3 cups cake flour
  • 2 teaspoons baking soda
  • 3/4 teaspoon salt
  • 1/2 teaspoon baking powder
  • 2 sticks (8 ounces) unsalted butter, at room temperature
  • 2 1/2 cups granulated sugar
  • 4 large eggs
  • 2 teaspoons vanilla extract
  • 1 teaspoon butter flavoring (optional)

For the creamy Center:

  • 1 cup cream cheese
  • 1/2 cup heavy cream
  • 6 tablespoons granulated sugar
  • 2 cups crushed oreos

For the chocolate Cream Cheese icing:

  • 2 ounces bittersweet chocolate
  • 3 sticks (12 ounces) unsalted butter
  • 2 tablespoons unsweetened cocoa powder
  • 1 cup powdered sugar
  • 1 teaspoon vanilla extract
  • 1 teaspoon butter flavoring (optional)
  • 1 cup cream cheese
  • (you can add some crushed oreos here if you like)
INSTRUCTIONS

For the cake:
  1. Heat the oven to 350°F. Butter and flour two 9-inch round cake pans. ( or if you like it simple like me, get some spray that already has flour in it) In a bowl, combine the coffee and cocoa powder and whisk until smooth. Add 1 cup cold water and whisk until combined. In a separate bowl, sift together the flour, baking so da, salt, and baking powder. Set aside.
  2. Using an electric mixer, beat the butter and sugar on medium speed until light and fluffy. Continue beating at medium speed while slowly adding the eggs, butter flavoring, and vanilla. Scrape down the sides of the bowl as necessary. Add the dry ingredients to the butter mixture alternately with the cocoa mixture until well combined. Pour into the prepared cake pans and bake until a toothpick inserted into the center of the cake comes out clean, about 45 minutes.
  3. Allow to cool 10 minutes in the cake pans, then turn out onto wire racks to cool completely.
For the Creamy Center:
  1. Whisk the Cream cheese, cream, and sugar until stiff peaks form. Gently fold in the crushed oreos. Set aside.
For the chocolate-Cream Cheese icing:
  1. Melt the chocolate in the microwave, or in a double boiler over low heat, if you like that better; set aside to cool. Combine the butt er, cocoa powder, and powdered sugar and beat until smooth. Next mix in the Cream cheese. Scrape down the sides of the bowl, and add the vanilla, butter flavoring, and cooled chocolate. Beat until well in corporated. Set aside at room temperature.
To Finish it off: Get one cake out and spread a layer at least 1/2 inch thick on it of the creamy center. Next flip the other c ake on top, and cover in Chocolate-cream cheese icing. Finally, sprinkle crushed oreos on top, mini chocolate chips might be good too, and if you wish make a few cake balls with some extra cake and apply them on top as well. O yeah, i also cut oreos neatly in half, and put them around the bottom of my cake, creating a cute border.


Cookies and Cream, Oreo, Cake balls :

I poured a little extra cake into a little pan, if you dont have one, you could use a muffin pan, or any mini cake pan. Then i crumbled up the cake, and added some icing,

and a tiny bit of the creamy center, i just est imated, but make sure you don't put too much icing and filling, because your cake balls could get a little runny. After that, roll them into balls and sometimes it's best to put t hem in the freezer for only a couple min. so that they are easier to roll in the chocolate, and they aren't falling apart on you. Next i melted some chocolate, rolled the balls in it, and placed it out. I used bittersweet, but for better results i might suggest trying a milk chocolate cooking bar, or melting milk choco late, chocolate chips. Finally i Rolled them in powder sugar before the chocolate got too hard.


Wednesday, April 9, 2008

Dinner AND a movie? Chinese Style: Mongolian Beef and Fortune Cookies from scratch!

MONGOLIAN BEEF:


Soo while i really love to make more desserts and such than actual meals, I really wanted to make some Chinese food. I found this recipe for Mongolian beef on http://www.recipezaar.com/66121 and it just happened to be a recipe like the Mongolian beef at P.F. Chang's which is my FAVORITE Chinese restaurant!
I changed the recipe a little by adding some broccoli around step 17, and cooking it in the sauce as well. I also found with this recipe it's much easier if you put out most of your ingredients at the beginning in the needed amounts, because it says to add lots of the ingredients quickly. I didn't have any dark brown sugar, however regular brown sugar worked just fine. In making it, I doubled the recipe since it says it only serves two, and I actually think doubling it can feed five, just make sure you make some rice along with it, we just made regular steamed rice.
Overall I LOVED this recipe! I actually think it t
asted a little better than P.F. Changs! It seemed sweeter though, which while i like that, my mom likes things spicy and not sweet, so you might want to take that into consideration in trying this. A little time consuming, but well worth it in the end.

Ingredients

  • 2 teaspoons vegetable oil
  • 1/2 teaspoon ginger, minced
  • 1 tablespoon garlic, chopped
  • 1/2 cup soy sauce
  • 1/2 cup water
  • 3/4 cup dark brown sugar
  • vegetable oil, for frying (about 1 cup)
  • 1 lb flank steak
  • 1/4 cup cornstarch
  • 2 large green onion
  • Directions

    1. 1
      Make the sauce by heating 2 tsp of vegetable oil in a medium saucepan over med/low heat.
    2. 2
      Don't get the oil too hot.
    3. 3
      Add ginger and garlic to the pan and quickly add the soy sauce and water before the garlic scorches.
    4. 4
      Dissolve the brown sugar in the sauce, then raise the heat to about medium and boil the sauce for 2-3 minutes or until the sauce thic kens.
    5. 5
      Remove it from the heat.
    6. 6
      Slice the flank steak against the grain into 1/4" thick bite-size slices.
    7. 7
      Tilt the blade of your knife at about a forty five degree angle to the top of the steak so that you get wider cuts.
    8. 8
      Dip the steak pieces into the cornstarch to apply a very thin dusting to both sides of each piece of beef.
    9. 9
      Let the beef sit for about 10 minutes so that the cornstarch sticks.
    10. 10
      As the beef sits, heat up one cup of oil in a wok (you may also use a skillet for this step as long as the beef will be mostly covered with oil).
    11. 11
      Heat the oil over medium heat until it's nice and hot, but not sm oking.
    12. 12
      Add the beef to the oil and sauté for just two minutes, or until the beef just begins to darken on the edges.
    13. 13
      You don't need a thorough cooking here since the beef is going to go back on the heat later.
    14. 14
      Stir the meat around a little so that it cooks evenly.
    15. 15
      After a couple minutes, use a large slotted spoon to take the meat out and onto paper towels, then pour the oil out of the wok or skillet.
    16. 16
      Put the pan back over the heat, dump the meat b ack into it and simmer for one minute.
    17. 17
      Add the sauce, cook for one minute while stirring, then add all the green onions.
    18. 18
      Cook for one more minute, then remov e the be ef and onions with tongs or a slotted spoon to a serving plate.
    19. 19
      Leave the excess sauce behind in the pan.


    DESSERT: FABULOUS CHOCOLATE-SPRINKLE FORTUNE COOKIES!


    After a great chinese meal , you have to have Fortune Cookies of course!! I
    found this recipe at About.com, and while they tasted great, I ended up having some trouble forming them to actually looking like fortune cookies. In the end one turned out right, and the rest wern't so great looking. I quirked the recipe a little. Adding my own flare, i put sprinkles in many of them, and instead of fortunes, since they were just for my family, I put chocolate chips in them before folding them over, this melted in the still-warm co okies, and tasted fabulous!

    INGREDIENTS:
    • 2 large egg whites
    • 1/2 teaspoon pure vanilla extract
    • 1/2 teaspoon pure almond extract
    • 3 tablespoons vegetable oil
    • 8 tablespoons all-purpose flour
    • 1 1/2 teaspoons cornstarch
    • 1/4 teaspoon salt
    • 8 tablespoons granulated sugar
    • 3 teaspoons water
    • (If you make it my way) Some colored sprinkles and a few mini chocolate chips (depending on if you want them all this way or not)

    PREPARATION:

    1. Write fortunes on pieces of paper that are 3 1/2 inches long and 1/2 inch wide. Preheat oven to 300 degrees Fahrenheit. Grease 2 9-X-13 inch baking sheets.
    2. In a medium bowl, lightly beat the egg white, vanilla extract, almond extract and vegetable oil until frothy, but not stiff.
    3. Sift the flour, cornstarch, salt and sugar into a separate bowl. Stir the water into the flour mixture.

    4. Add the flour into the egg white mixture and stir until you have a smooth batter. The batter should not be runny, but should drop easily off a wooden spoon. Note: if you want to dye the fortune cookies, add the food coloring at this point, stirr ing it into the batter. For example, I used 1/2 teaspoon green food coloring to make green fortune cookies.
    5. Place level tablespoons of batter onto the cookie sheet, spacing them at least 3 inches apart. Gently tilt the baking sheet back and forth and from side to side so that each tablespoon of batter forms into a circle 4 inches in diameter.
    6. Bake until the outer 1/2-inch of each cookie turns golden brown and they are easy to remove from the baking sheet with a spatula (14 - 15 minutes).
    7. Working quickly, remove the cookie with a spatula a
    nd flip it over in your hand. Place a fortune in the middle of a cookie. To form the fortune cookie shape, fold the cookie in half, then gently pull the edges downward over the rim of a glass, wooden spoon or the edge of a muffin tin. Place the finished cookie in the cup of the muffin tin so that it keeps its shape. Continue with the rest of the cookies.
    (this is obviously the part where i failed. Learn from my mistakes, and just use the end of a big spoon or spatula to fold it over at the end. I was confused because I couldn't see how this affected the end result, however it does mold them to actuall y look like fortune cookies.)

    My one Good Fortune cookie: This is how they should turn out!


    Crazy Funny Asian Prank (kinda fits with the theme):

    Saturday, April 5, 2008

    Brownie Choco-Chip CupCakes

    YAY first post!
    So I'm new at this.. but I'm really excited! anyways... I made these for some friends coming over, and they tasted AMAZING!!

    Although I'd rather make my own mix, i had some left over brownie mix hanging around the house so i decided to use it up. Instead of making the same old brownies I made these brownie cupcakes and they are just as easy only slightly cuter i think. I didn't use muffin cups, instead I just sprayed my pan down with some cooking spray that has flour in it. Just make sure to watch them because they cook a little faster than usual brownies!

    Cupcake brownie Photo Shoot:Turquoise-Chocolate


    Kellyns Flower:

    SpiKeY:


    All that was left this morning, they were THAT amazing!